Introduction
In this article, we will show you how to connect an IP camera to a wifi router using simple and easy-to-follow steps.
This can be difficult for those who are not familiar with technology, but we have compiled all of the information steps by step on how to connect an IP camera to a wifi router in an easy manner for everyone.
The five major topics covered in this article are listed below.
- What is an IP Camera?
- HOW DO NETWORKED IP CAMERAS WORK?
- What Are the Uses of an IP Camera?
- Types of IP Cameras
- How Can an IP Camera Be Connected to a Wi-Fi Router?
- What are the Pros and Cons of an IP Router?
- Final Thoughts
What is an IP Camera?
An IP camera, also known as an Internet protocol camera, is a type of digital security camera that receives and transmits video footage over an IP network. They are frequently used in surveillance. In contrast to analog closed-circuit television cameras (CCTV), IP cameras only require a local network. IP cameras, like phones and computers, connect to a network in the same way.
An IP camera is an abbreviation for an Internet Protocol camera. It is a networked digital video camera that sends images and receives control data over a Fast Ethernet link. As a result, IP cameras are also referred to as network cameras. These network cameras are most commonly used for IP surveillance, which is a networked and digitized version of closed-circuit television (CCTV). However, unlike CCTV cameras, they do not require a local recording device and only a local area network (LAN).
In a nutshell, an IP camera is a type of digital video camera that sends and receives data via the internet.
How Do Networked IP Cameras Work?
To transmit video to a digital video recorder, analog and analog-over-digital security cameras require a coaxial video cable (DVR). An IP security camera, on the other hand, can transmit video over a wireless connection. IP cameras, in particular, connect to a network video recorder (NVR) via Wi-Fi, Ethernet cable, or USB.
An IP camera records video in high definition, with resolutions as high as 16 megapixels depending on the camera model. Each IP camera includes a processing chip that compresses video footage as it is recorded. What does this mean? The more data each video recording contains, the higher the camera resolution. High-resolution images necessitate more storage space and data transmission bandwidth than lower-quality images.
To avoid consuming too much bandwidth when transmitting HD images over a network, IP cameras must compress or shrink the files. Modern compression standards, such as h.264 and MPEG-4, ensure that there is no or only a minor drop in frame rate and resolution when the footage reaches your phone or computer.
What Are the Uses of an IP Camera?
Surveillance is the most common application for an IP camera. It is used to create a sense of security and safety in homes, offices, schools, and college dorms. It is widely used for surveillance in a variety of settings due to its ease of installation and wireless capability. The broadcaster has complete control over an IP camera live streaming. As the name implies, this digital camera does not require a constant human operator on the field.
As a result, it can be used in situations such as the ones listed below, where it can partially replace human presence in terms of security-
- Inside classrooms and lecture theatres
- Traffic cameras
- Inside a home for personal security
- Business and event security cameras
- Sports complexes etc.
IP cameras are also useful for monitoring machinery and reducing downtime. IP cameras also include the following features:
- Audio alerts.
- Thermal detection of overheating.
- Level monitoring etc.
Clearly, the IP camera has a wide range of applications available to its users.
Types of IP Cameras:
PTZ IP Camera:
Pan-tilt-zoom (PTZ) cameras can be adjusted by a remote operator, allowing users to track events with greater precision. They have the potential to cover large areas and are frequently used to monitor public outdoor spaces.
Fixed IP Camera:
Fixed IP cameras are fixed in place and provide a single view within the camera’s field of vision, continuously monitoring subjects within a predetermined frame. Fixed cameras are widely used both outside and inside, most notably in retail stores and business offices. They require less bandwidth to support than PTZ cameras.
PoE or PoE+ IP Camera:
PoE IP cameras use an Ethernet cable (typically Cat 5 or 6) to supply both power and data at the same time. This eliminates the need to run two separate cables for power and data, reducing the amount of hardware required. PoE systems are easier to install and maintain than traditional systems because they have fewer parts to deal with.
The amount of electricity transmitted to power their systems differs between PoE and PoE+. Most IP cameras are powered by standard PoE systems, which can transmit up to 15 watts of electricity. PoE+ systems can transmit up to 30 watts and are typically used in higher-power cameras that have their own heating and cooling mechanisms.
Wireless IP Camera:
To send video data, wireless IP cameras connect to a WiFi router. The footage is then saved to the cloud or the camera’s local built-in storage. Wireless IP cameras can be a good solution for small homes, but for larger areas, a wired camera system is less susceptible to interference and is recommended.
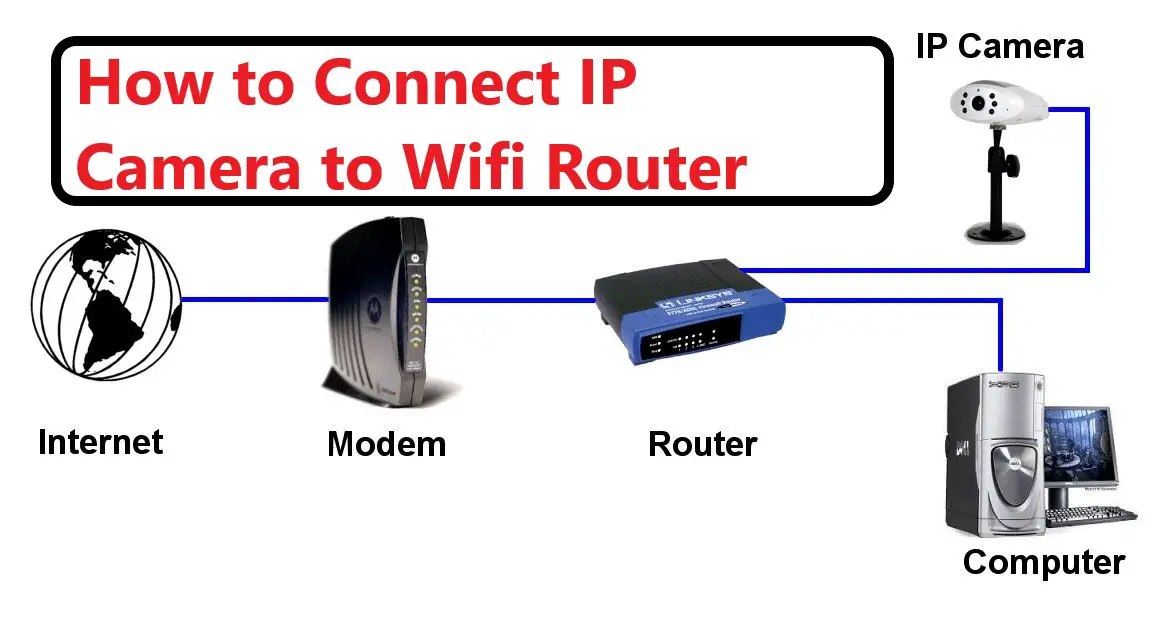
How Can an IP Camera Be Connected to a Wi-fi Router?
Network cameras appear to be gaining popularity, and why not, given the wide range of services they can provide with ever-improving quality, features, and decreasing prices? The steps required to connect an IP camera to a Wi-Fi router are outlined below.
When the camera is connected to the router via an Ethernet cable, make sure you can see it on your desktop or laptop.
Determine the WIFI strength of Your Wireless Signal:
Understanding the limitations of wireless equipment is the first and most important step when considering a security camera system.
It is necessary to test the connection strength in every nook and cranny of every location where a wireless security camera will be installed. It is recommended to avoid making compromises when it comes to wireless because it can be difficult to troubleshoot.
Make the right configurations for your network:
Unless otherwise specified, the wired IP address of our IP cameras NVRs is 192.168.1.108. In order to view the camera’s web service, the user may need to change the network configurations.
Make the Connections:
First, connect the camera to the wireless router’s LAN port with an Ethernet cable. To configure the camera from the start, a wired connection would be required.
Configuration interface of the camera:
Open INTELLIGENT IP INSTALLER (found on the resource CD) on a desktop or laptop that is connected to the same wireless router, and then highlight your camera. When you click the link to the IE button, IE will launch automatically and the login window will appear.
Then, on the login page, enter the username and password (the default username and password are both admins), and click OK to connect to the device. There will be a display of the web configuration interface.
Access the IP Camera’s Web Interface:
Navigate to the IP address of the camera. Log in with your username and password. Then select [Setup> Network> TCP/IP]. It is important to note that you cannot connect a camera to Wi-Fi from the NVR web interface; you must be inside the camera. Check the image on the top left to make sure it says IP CAMERA and not WEB SERVICE to ensure you’re in the correct web interface.
Configure the Wi-Fi address:
Select the wireless option from the drop-down box that says WIRE(DEFAULT). Click the button next to the DEFAULT drop-down box.
Continue by selecting the RADIO button labeled STATIC. The camera’s address can now be changed. It must also be ensured that the address does not conflict with another device on the network.
AFTER YOU’RE DONE, CLICK SAVE.
REGISTER AGAIN.
Connect the IP camera to the router:
Navigate to [Setup> Network> Wi-Fi] and select the ENABLE checkbox. After you’ve found your network, double-click it and enter your credentials.
Allow your camera 2 minutes to boot up, as it may take some time to connect to the wireless network you just configured. Then, using the wireless IP address, try connecting to the camera via a web browser. You will be able to see the camera’s login page. The camera is now ready to be mounted!
Pros and Cons of Installing an IP Camera
Everything in the universe is bound to have both pros and cons. Here are some examples of IP Cameras:
Conclusion
By the end of the article, it is clear that the ability to install IP cameras and connect them to Wi-Fi routers would only be beneficial in terms of security and safety. It is also extremely simple to install, making it a breeze. I hope this article on How to Connect an IP Camera to a WiFi Router was helpful.